

Getting engaged is exciting. Suddenly, you are choosing floral arrangements, tasting cakes, and curating extensive guest lists. But then the logistics hit you-you have to figure out how to create a wedding invitation website. Do not panic! I am here to personally guide you through the entire process, minus the tech headaches.
Building a dedicated site for your big day is no longer just a fun little extra; it is a vital necessity for modern couples. It saves you substantial money on paper goods, keeps your guests continuously informed, and helps you track those elusive RSVPs without losing your mind. Whether you are hosting an intimate rustic barn party or a massive, elegant ballroom gala, having a digital home for your event makes everything run smoother.
In this comprehensive guide, I will walk you through exactly how to create a wedding invitation website from scratch. We will cover everything, from picking a custom domain name to integrating your gift registries. Let’s dive right in and start bringing your digital dream to life!
Why You Need to Know How to Create a Wedding Invitation Website
You might honestly be wondering if you need a website for your nuptials. The short answer is an absolute, resounding yes! When you learn how to create a wedding invitation website, you unlock a powerful, central hub for all your event details. Guests lose paper invites and misplace detail cards all the time. A website, however, is always just a quick tap away on their smartphones.
Beyond just sharing the date and location, your site acts as a massive time-saver for you. Instead of answering the exact same questions about hotel blocks or dress codes via text message fifty times, you can simply point people to your digital space. It streamlines communication and significantly reduces your pre-wedding stress levels.

the environmental impact is undeniable. Going digital means utilizing far fewer paper products, which is a fantastic choice for eco-conscious couples. It is a modern solution to an age-old logistical challenge.
Learn more: about digital invitations
Choosing the Best Wedding Website Builders for Your Needs
Before you can build anything beautiful, you need the right tools in your arsenal. The market is packed with excellent wedding planning platforms designed specifically for couples with zero coding experience. Your primary goal is to find a platform that perfectly matches your aesthetic preferences and functional needs.
Let’s look at some of the best wedding website builders available right now [1, 2]. I have tested these platforms extensively, and they consistently offer the best mix of beautiful templates, reliability, and user-friendly features.
rising trend of digital RSVPs for modern weddings
Wix: The Versatile Option for Digital Wedding Invitations
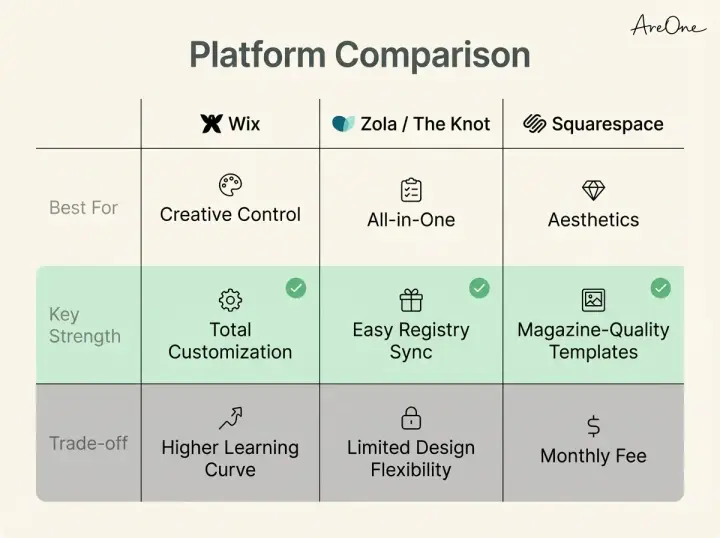
If you desire total creative control over your design, Wix is an absolute powerhouse. It is not exclusively built for weddings, but it offers a massive, high-quality library of templates perfectly suited for the occasion. When you are figuring out how to create a wedding invitation website with a unique flair, Wix lets you drag and drop elements exactly where you want them.
You can easily integrate beautifully designed digital wedding invitations, set up custom RSVP forms, and even add a live countdown clock. The design flexibility here is unmatched, especially if you have a specific, artistic vision for your layout that standard platforms cannot accommodate.
Zola & The Knot: All-in-One Wedding Planning Platforms
For couples who want a streamlined, all-inclusive planning experience, Zola and The Knot are legendary within the industry. These popular wedding planning platforms do heavy lifting far beyond just website creation. They integrate your guest list, your timeline checklist, and your retail registries into one unified dashboard.
If you are short on time and desperately want to know how to create a wedding invitation website quickly, these platforms offer stunning, pre-made themes. The trade-off is slightly less design flexibility compared to Wix, but the sheer convenience makes them top contenders for busy couples.
See our guide on wedding gift registries
Squarespace: High-End Custom Wedding Templates
Do you value sleek, magazine-quality aesthetics above all else? Squarespace is your ultimate go-to builder . Known globally for visually striking designs, this platform offers some of the most elegant and refined custom wedding templates currently on the market.
While it has a slight learning curve compared to Zola, the visual results are breathtaking. Squarespace sites are naturally mobile-responsive, ensuring your digital wedding invitations look perfect on any device. If showcasing high-quality photography is a top priority for you, Squarespace makes your engagement photos shine brilliantly.
Step-by-Step Guide on How to Create a Wedding Invitation Website
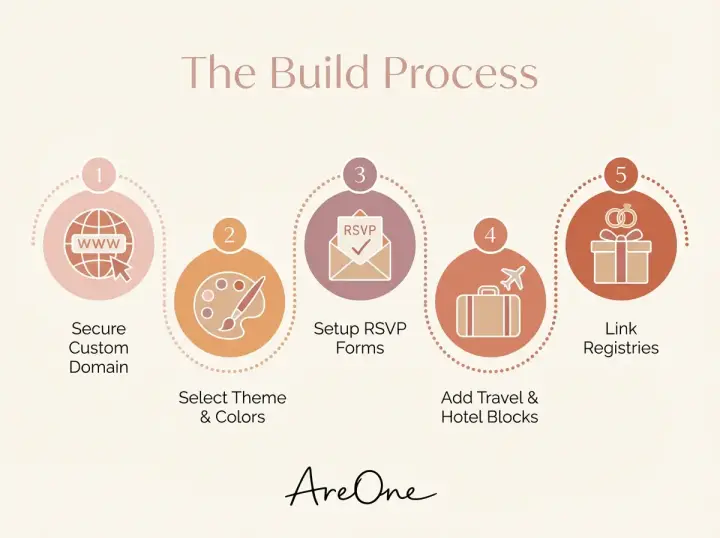
Now that you know your platform options, let’s roll up our sleeves. Building your site is actually a fun and creative process once you break it down into manageable steps. Here is your fail-proof roadmap on how to create a wedding invitation website that instantly wows your guests.
Step 1: Pick a Custom Domain Name
Your very first official task is securing a custom domain name. While free platforms offer generic, heavily branded URLs (like areone.com/i/yourname), a custom domain (like jackandjillgetmarried.com) looks polished and professional.
It makes your site much easier for guests to remember and type directly into their web browsers. Most website builders allow you to purchase a domain through their interface. Keep the name short, sweet, and relevant to your names or your chosen wedding hashtag.
wedding etiquette and timelines
Step 2: Select Your Theme and Colors
Next, dive into the visual side of things. Your website should perfectly reflect the anticipated vibe of your actual event. If you are having a relaxed beach ceremony, opt for light, breezy custom wedding templates with cool blue and warm sandy tones. For a formal evening affair, dark backgrounds paired with elegant serif fonts work beautifully.
Visual consistency is key here. Ensure the colors and fonts you choose for your digital wedding invitations match the physical save-the-dates or any traditional paper elements you still plan to mail out.
Recommended ReadingWedding Website Checklist: Everything You Need to Include →Step 3: Add Essential Details and RSVP Integration
A beautiful site is useless if it lacks crucial information. You must boldly display the date, time, and exact locations for the ceremony and reception. Be extremely clear about this timing, especially if the two events are taking place at different venues.
Crucially, you need robust RSVP integration. Learning how to create a wedding invitation website effectively means setting up a reliable digital RSVP form. Ask guests for their attendance status, specific meal preferences, and any dietary restrictions. This vital data will automatically compile into an organized spreadsheet for you.
See our guide on wedding RSVP management
Step 4: Include Travel Info and Guest Management Tools
If you have out-of-town guests traveling, your website is their ultimate weekend survival guide. Create a dedicated, detailed page for travel and accommodations. List your reserved hotel block details, nearby airports, and local transportation options.
Utilize the advanced guest management tools provided by your chosen platform. You can often recommend local restaurants, popular tourist attractions, and your favorite coffee shops. Going the extra mile here shows your guests you care about their experience.
Learn more about wedding planning online
Step 5: Connect Your Wedding Gift Registries
Nobody likes fielding awkward text messages about gifts. Your new website handles this delicate topic gracefully. Most top-tier wedding planning platforms allow you to embed your registries directly onto a dedicated page.
Whether you are registering for traditional home goods, setting up a honeymoon cash fund, or asking for a charity donation, put all the respective links in one tidy place. It is polite, convenient for your guests, and keeps your physical mail clutter-free.
Tips for Making Your Site Truly Yours
You now have the solid technical foundation down. You understand exactly how to create a wedding invitation website that functions perfectly. However, you want it to feel authentically like you, not just a sterile, out-of-the-box template. Let’s add some serious personality to the mix.
Tell Your Unique Love Story
Guests love reading about how you two met! Add a dedicated “Our Story” section to the navigation bar. Keep it relatively brief but sweet. Share the quirky details of your very first date or the romantic proposal story. You can also include short, funny bios for your wedding party members so guests can put faces to names.
Build an Extensive Photo Gallery
Browse invitation layouts that fit your plan.
Compare layouts for schedules, travel details, guest guidance, and RSVP information before choosing one for your invitation.



You paid good money for those stunning engagement photos-show them off proudly! A beautiful, grid-style photo gallery breaks up the heavy text on your site and gives guests a lovely visual treat. You can even include candid, funny shots from your relationship timeline. Just ensure you compress the images slightly so your website loads quickly for everyone.
Add a Custom Wedding Playlist
Music sets the tone for everything. Why not give your guests a sneak peek of the reception vibe? Many of the best wedding website builders let you embed a Spotify or Apple Music widget right on the homepage. You can curate a playlist of your favorite love songs, or even allow guests to use the RSVP form to submit their own song requests for the DJ!
Overcoming Common Tech Hurdles
Even when using the very best wedding website builders, you might occasionally hit a small technical snag. A common issue couples face is weird formatting on mobile devices. Always, always preview your built site on your smartphone before hitting the publish button. What looks perfectly spaced on a large desktop monitor might look terrible on a mobile screen.
Another hurdle is browser compatibility. Sometimes, certain custom fonts do not load correctly on older web browsers. Stick to web-safe fonts provided by your platform. If you struggle with custom domain name mapping, do not hesitate to use the platform’s customer support chat. Remember, figuring out how to create a wedding invitation website should be exciting, not tear-inducing.
When to Launch and Share Your Website
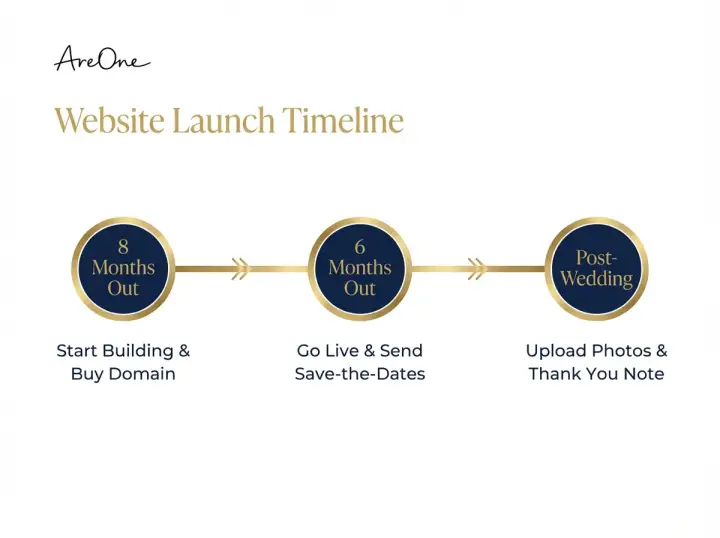
Timing is everything when it comes to wedding communication. You should aim to have your website completely live and functional before you send out your physical save-the-dates. This is typically about six to eight months before the wedding day. Print your custom domain name prominently directly onto your save-the-dates.
This generous timeline gives guests ample opportunity to bookmark the page, check out travel arrangements early, and mark their busy calendars. As you finalize smaller details later on-like the exact dinner menu or shuttle bus schedules-you can simply update the site. The true beauty of digital wedding invitations is that they are fluid, editable, and always up to date.
Etiquette for Digital Wedding Communication
While we are thoroughly discussing how to create a wedding invitation website, we must briefly touch on modern etiquette. The digital age has certainly relaxed many traditional planning rules, but displaying good manners never goes out of style.
Handling Plus-Ones Gracefully
First, clearly dictate who is actually invited. The digital RSVP form should ideally restrict guests from manually adding unexpected plus-ones. Most advanced wedding planning platforms allow you to assign a specific, strict number of seats to each party. If a guest tries to RSVP for three people when they were only given two seats, the system will gently stop them. This saves you an awkward phone call later.
Need a faster RSVP flow?
Use AreOne to collect guest replies, meal choices, and reminders in one clean workflow.
Communicating Dress Codes Clearly
Dress codes can cause major anxiety for guests. Use your website to eliminate the guesswork entirely! Create a small section detailing exactly what “Beach Formal” or “Semi-Formal” means to you. You can even include a Pinterest board link with visual examples of acceptable outfits. Clarity here prevents guests from showing up in jeans to your black-tie event.
Privacy and Password Protection
Another crucial aspect of modern wedding sites is digital privacy. You are sharing intimate details, specific dates, and venue locations on the open internet. Do you really want random strangers stumbling across your venue details?
Many of the best wedding website builders offer simple password protection. You can easily require a simple password (like your wedding date or a shared inside joke) to access the site content. Include this password clearly on your save-the-dates. It provides massive peace of mind and keeps your celebration delightfully exclusive.
Budgeting for Your Wedding Website
One of the most appealing aspects of learning how to create a wedding invitation website is that it can be cost-effective. However, it is essential to understand the potential expenses involved so you can budget accurately from day one.
Many top-tier wedding planning platforms offer surprisingly robust free versions. Sites like The Knot and Joy allow you to build a beautiful, functional site at zero cost. These free tiers usually include standard custom wedding templates, basic RSVP tools, and registry linking capabilities. For couples on a tight budget, this is a phenomenal, risk-free resource.
When to Pay for Premium Upgrades
So, why do couples ever pay for website builders? The costs usually come into play when you want to elevate the digital experience. For instance, purchasing a custom domain name typically costs between $10 to $20 per year. It is a very small price to pay for a personalized URL instead of a clunky, heavily branded link.
platforms like Wix and Squarespace require a monthly subscription fee if you want to completely remove their company branding and unlock the most advanced custom wedding templates. These specific fees can range from $12 to $25 per month.
Hidden Fees to Watch Out For
Always read the fine print regarding your wedding gift registries. While creating the website might be free, some platforms take a small percentage fee (usually around 2.5%) when guests contribute cash to your honeymoon fund using a credit card. You can often choose whether you absorb this fee or pass it on to the guest. Factoring all these small numbers into your wedding budget is a very smart move.
Maximizing Your Website After the Wedding
Your beautifully crafted website doesn’t have to die the exact moment you finally say “I do.” You spent considerable time learning how to create a wedding invitation website; you might as well get the maximum value out of it!
After the event concludes, thoughtfully transform the site into a digital memory book. Change the homepage text to a massive “Thank You” message addressed to all your attendees. Upload the professional, high-resolution photos from your photographer and create a video gallery for your cinematic wedding film.
Guests love looking back at the fun they had celebrating you. You can also leave the custom domain name active for an entire year so friends can easily download their favorite pictures. It is a wonderful, modern way to wrap up the entire wedding experience and keep the joy alive long after the last dance.
Final Polish and Launch Day
Before you bravely share your digital masterpiece with the world, do a comprehensive review. Click every single link to ensure it works properly. Fill out a dummy RSVP form to guarantee the data correctly routes to your email or dashboard. Ask a trusted friend or family member to proofread the text for embarrassing typos.
Once you are confident everything is flawless, enthusiastically hit that publish button! You have successfully mastered exactly how to create a wedding invitation website. Now you can focus your energy on the fun parts of planning, knowing your guests are informed and your digital RSVPs are magically organizing themselves.
I hope By thoughtfully choosing the right platform and closely following these steps, you are well on your way to digital perfection. Remember, when you finally master how to create a wedding invitation website, you can say “I do” to a seamless RSVP process!
Frequently Asked Questions
Find quick answers to common questions about this article.

No approved comments yet.